
How to Quickly Start an Online Store Step-by-Step Guide
The eCommerce industry has seen massive growth in recent times with lots of people creating an online store every day, and the reason is undeniable.
According to Digital Commerce 360 global e-commerce sales grew by 18% in 2018, with consumers spending over $2.86 trillion on the internet. In the US alone, eCommerce sales grew by 15% in 2018, which is 14.3% of total retail sales.
Isn’t that amazing?
But it’s not just the financial benefits that make the industry so tempting. Aside from the glamour of making money from sales, lots of aspiring online sellers are equally drawn in by the freedom and flexibility that starting an online store can offer.
For example, it allows you to operate from any location of your choice, grow at your own pace, and to be your own boss.
In this article, you’ll get to learn how to start an online store from scratch and everything you need to know about the business.
How to Start an Online Store
Here’s a step-by-step guide to starting an online store in 2019 and beyond.
Step 1: Decide What You Want to Sell
The product you choose to sell on your store is one of those critical things that’ll guarantee the success or failure of your store. You want to take your time to thoroughly research the market before choosing a product.
One of the biggest mistakes you’ll make is to jump into a niche simply because you like it. Admittedly, being personally interested in a niche really helps when building your store.
However, it’s also a common trap for choosing a niche that isn’t really lucrative or profitable. If there isn’t enough demand in a niche, it doesn’t matter how beautiful and enchanting your store is; you’re doomed to fail from the start.
That being said, there are some things you must consider when searching for a good product to sell.
1.1 Avoid going into a niche that’s too unique.
In marketing, differentiating yourself is always a good practice. Of course, you don’t want to be like everyone out there.
But it’s also challenging to find an authentic way to differentiate yourself. There are literally many ways to differentiate a product, but only 1 to 2 genuinely matter.
For example, does the top-rated car charger on Amazon need to do something unique and crazy? Not at all! It just needs to be reliable, easy to use, simple, reasonably priced, and have a bunch of reviews on Amazon. That’s all!
Therefore, instead of differentiating yourself from other products in your category, you want to find a category with competitors that are not entirely dominating their marketing channel.
For instance, you should provide an answer to the following questions:
- Are the reviews on Amazon low for all the top products?
- Is the product bringing up low-quality SEO results?
- Are there no companies that are spending enough dollars on ads behind the product?
If you answered yes to these questions, there’s an excellent opportunity for you to out-smart and outrank them with your marketing.
1.2 A moderate price is also important.
Looking away from low-priced product categories makes lots of sense. Besides, if you only earn $1.5 in profit for every sale, you will have to sell about 100,000 products per year to support yourself. After taxes and other expenses, you’ll still have about $70 to $80K per year to live on.
Obviously, selling 100,000 of any product is not an easy task.
Now, assuming that you’re selling a product for $50 and making $25 in profit per sale. To reach $100,000 per year, you will only have to sell 4,000 items. That’s a lot easier and manageable.
However, you equally want to avoid selling products with a high price tag. This is because the more expensive an item gets, the buying behavior also increases.
People will want more proof. They may even require an entirely different buying process to make the purchase.
Think about it: how many people buy cars without first test-driving them? Most people don’t. They’ll want to see the item and even speak to a real person before making such a big purchase.
High-priced items like cars require lots of extra work and selling skills to convince someone to buy because of their price.
This is why it’s good to find a product that you price between $50 and $100 dollars. It’s low enough that the entire buying process will be seamless – and it’s equally high enough that sales will add up quickly.
1.3 Make sure the products are in-demand
You can usually know if there’s demand for a product by performing some category research on your marketing channel.
For example, you can use the “Google Keyword Planner” keyword research tool to know how many times a product is searched in Google each month.
If your product’s keyword gets less than 1,000 searches per month, it’s perhaps too small to build a store on.
And looking at other eCommerce platforms like Amazon, if you find it hard to find products in your category with over 100 reviews, it’s also probably not popular enough.
Nowadays, it’s better to pick a category that you have zero experience in but has good demand. That’s much better than finding out that a hobby category you choose has zero demand later on.
Step 2: Decide What You Want to Sell
This is a very challenging step.
It can be really daunting and annoying to find a good name that’s available. The domain names are taken, the good names have been trademarked, and you will feel as if you’re simply wasting your time.
In other words, it’s tricky to find suitable names.
Whenever I’m searching for a name for a new project, I usually feel the need to cut corners. After many days of brainstorming great names and achieving zero results, I’ll feel like picking a less-than-perfect name just so I can proceed to the next step.
However, I always have to remind myself that it’s well worth all the efforts to keep searching. It’ll definitely pay off if I keep looking and it always does.
Here’s a simple naming checklist I often use:
It should be easy to spell: I don’t want people to find it hard to find my website/store.
Pass the Bar Test: I should be able to mention the name in a very lousy bar without repeating myself. This is a good sign that it’s pretty easy to understand. This is vital for word-of-mouth marketing.
Relevant to your category: It’s essential that the name is relevant to your product category in some way.
Consists of 3 words or less: It’s good to keep it as short as possible so people can easily remember it. One or two words are perfect; three are still impressive.
The .com domain is available: Every online store needs a .com domain. It has become too much of a standard today. Some folks use odd domains like company.io or company.online. This usually causes problems later on because someone that owns a company.com will know how valuable it is the moment you try to buy it. In this case, I either buy the domain early or just find an available one.
Have no trademark clash: Any corporate law firm can easily check this for you. Since legal time is costly, find 3 to 5 domain options that meet all the above criteria. Then have an attorney examine them all at the same time for trademarks. You’ll certainly have at least one of them work for you.
Once you’ve picked a name, register it using your favorite domain registrars such as Namecheap or Godaddy.
Step 3: Choose a Store Builder
There’s basically no shortage of store builders on the internet today. Some of the most popular online store builders are:
- WooCommerce;
- Shopify;
- BigCommerce.
Etc.
Each one of them offers a varying degree of sophistication and unique features.
So whether you’re a tech-savvy individual who wants the ability to customize everything, or you simply want an easy-to-use platform that lets you build an online store as quickly, it’s best to research and find the one that’s most suitable for your business.
That being said, here are a few things to consider while choosing a store builder:
3.1 Does the store come with a domain and hosting?
A domain name and web host are the basic requirements of online stores, which is why many store builders on the web have started offering these services.
Therefore, if you haven’t registered a domain and hosting for your new store, choosing a store builder that offers them for you can be a huge time-saver.
3.2 How does it handle shipping and inventory management?
If you’ll be selling physical products, you will need tools that’ll help you to monitor and track your inventory and ship the items out to customers in a timely manner.
Interestingly, some builders will have inbuilt solutions to help you tackle those concerns, while others might need you to find and install 3rd-party plugins.
3.3 Does it integrate with other marketplaces such as eBay and Amazon?
Some sellers, especially those that have an already established brand identity, want the freedom to have their products listed across multiple sales channels.
So, if you intend to expand beyond a single branded online store in the future, opt for a store builder.
3.4 Do they provide access to other marketing tools?
Your relationship with your customers should not start and end when they leave your website or purchase something from your online store.
As your business grows, you will need tools such as ‘abandoned cart emails’ to remind visitors about the items they leave in their shopping cart as well as confirmation messages and order notifications to notify shoppers that you’ve processed their order and it’s on the way.
3.5 Does it integrate with social media?
Social media platforms, particularly Instagram and Facebook, have become essential marketing tools for online sellers.
You want to choose a store builder that makes it easy to share and promote your products across all your social channels. This is a fantastic way to reach new people, create brand awareness, and generate more sales.
If your answer is NO to questions 4 and 5 above, can it be connected with other services or apps that offer those features?
Here’s the thing: your preferred online store builder might not provide all the necessary features needed to sell your products as well as manage your marketing, and that’s fine.
But choose something that’ll make the entire process effortless for you.
Setting Up Your Online Store Platform
Once you’ve decided on a product to sell, picked a domain name, and selected the store builder that’s suitable for your business, it’s now time to build your store.
But before we start, you’ll also need an SSL certificate, which adds a special security layer on your site. This will enable you to accept sensitive information like credit card numbers and other personal data. This is needed so you can accept credit card payments on your site.
So here’s a breakdown of your startup cost:
- Domain name (costs about $14.99 per year)
- Web hosting (costs about $7.99 per month)
- SSL certificate (costs about $69.99 per year)
That’s a lot of startup costs.
For this tutorial, we’ll be using the WooCommerce store builder to create our store, which will be hosted on the Bluehost server.
Remember, the hosting company you choose will ultimately affect your store either in a good or bad way, especially in terms of your website speed, uptime, and security.
Excitingly, you can get hosting at just $2.75 on Bluehost now, and this also comes with a free domain name and free SSL certificate. This will drastically cut down your startup cost.
Step 1: Buy a Hosting Account
Now, follow the steps below to buy Bluehost hosting and start your online store.
Visit Bluehost and click on the bold “Get Started” button to get started.

On the next page, choose a hosting plan that is most suitable for you (the basic and plus plan are the most popular).
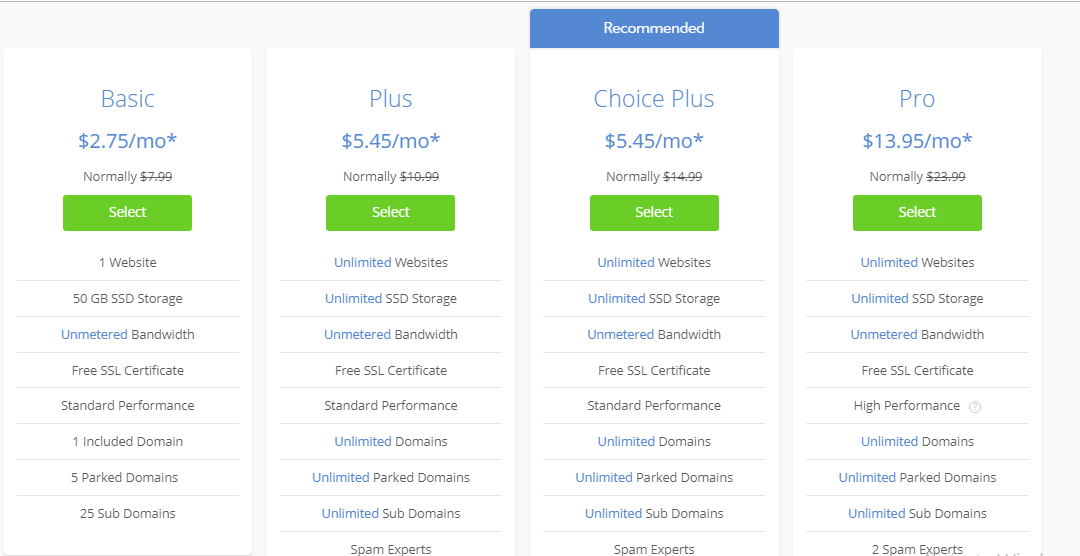
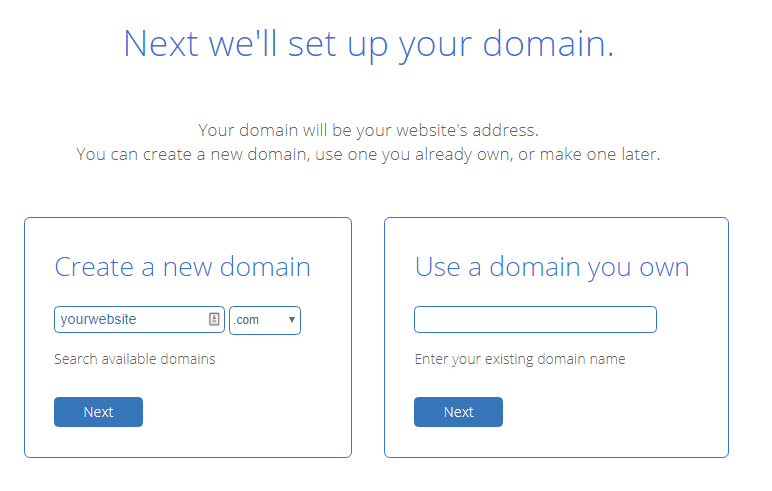
Once you’ve chosen your desired plan, the next page will ask you to enter the domain name for your new website.
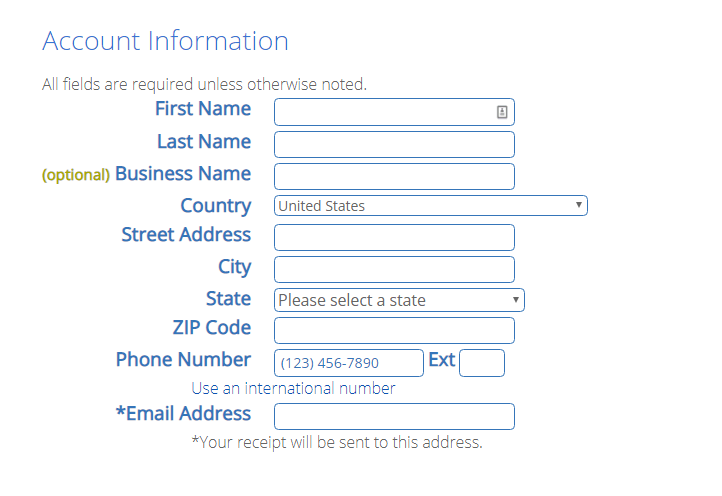
Finally, you will be asked to enter your hosting account information:
And then you’ll also enter the package information to complete the registration process. You’ll also see optional add-ons that you can buy on this page.
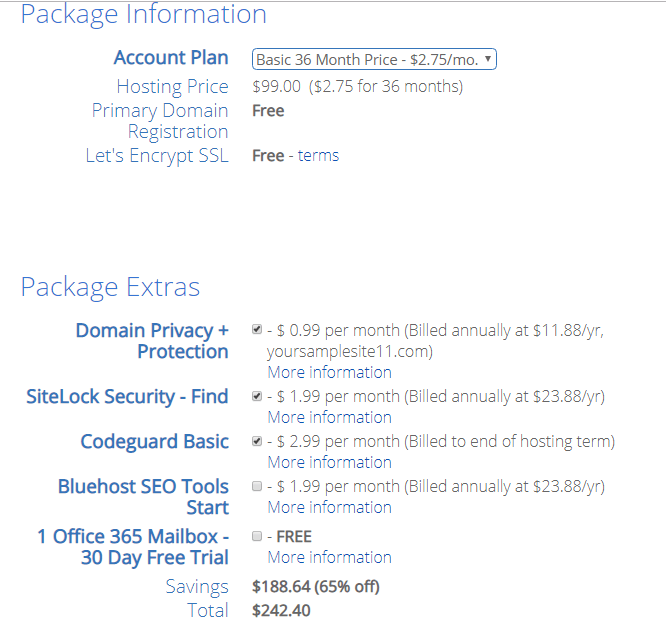
It’s up to you whether or not you buy these, but we don’t really recommend buying them. You can always add them in time (if you decide that you need them later).
Once everything is done, you will get an email from Bluehost with the necessary details on how to login to your new hosting control panel (cPanel), which is where you’ll be managing everything from emails, support, etc.
Now, login to your cPanel, and you’ll notice that WordPress is already pre-installed on your site. Isn’t that amazing?
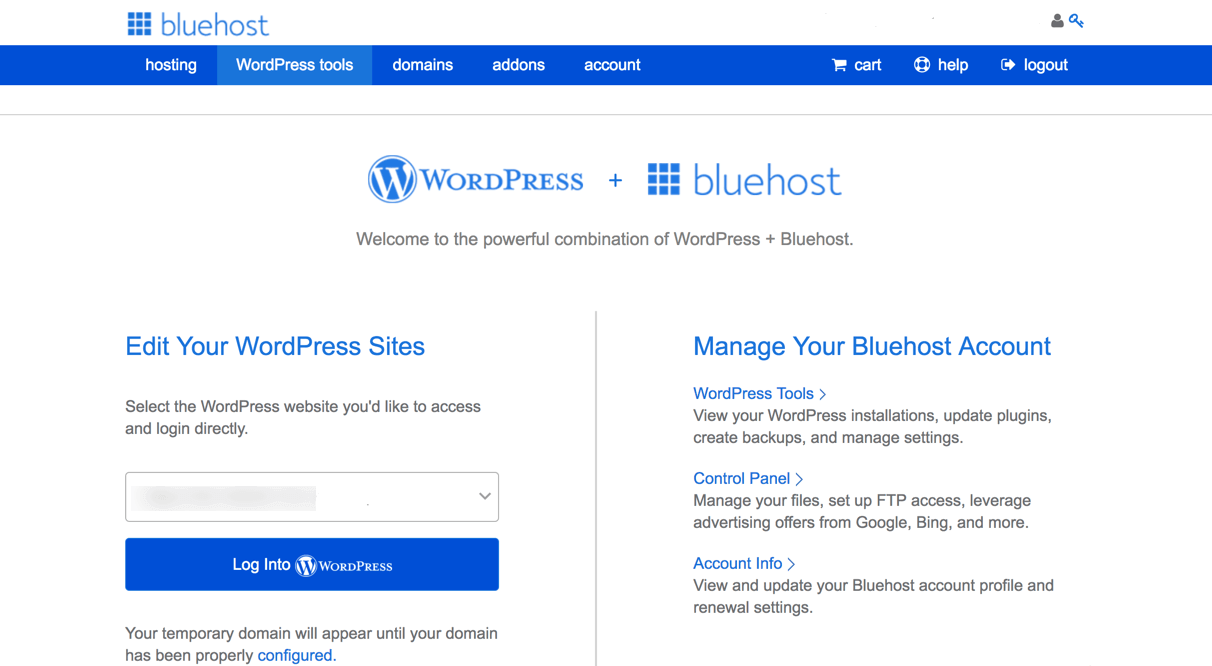
Simply click on the “Login to your site” button, and you will be taken to your WordPress site’s dashboard.
Congrats, you’re done creating your hosting account and installing WordPress + WooCommerce.
Now, let’s quickly setup your WordPress website and your online store.
Step 2: Setting Up WordPress
Good enough, WordPress and WooCommerce have been automatically installed on your website by Bluehost.
When you log in to your WordPress dashboard for the first time, you’ll see a welcome message with the setup wizard that’ll help you setup your site.

You want to click on the “No Thanks” button to close it. Don’t worry; we’re here to walk you through all the necessary steps.
Once you close the start wizard, you will now see your WordPress admin dashboard which looks like this:
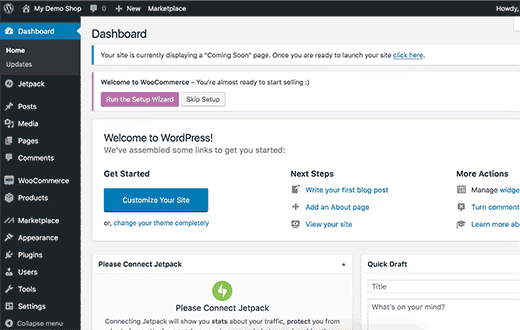
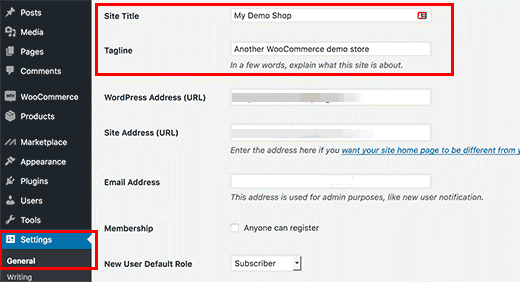
The first step here is to visit Settings >>General to setup your website’s title and description.
Setting up HTTPS to Use SSL
As I mentioned earlier, Bluehost will give you a free SSL Certificate once you buy their host. This certificate is already pre-installed for your domain name. However, you need to configure your WordPress site, so it loads as https instead of http.
On the same Settings,>> General tab, you should change your WordPress Address (URL) and Site Address (URL) to use https as you can see on the screenshot below:
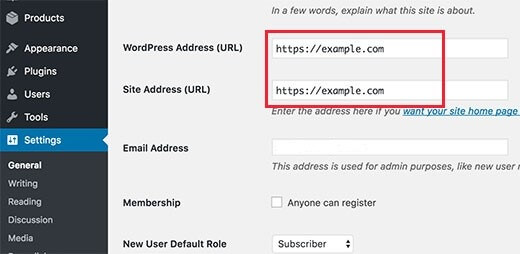
Once this is done, scroll down to the bottom of the page and click the “save changes” button to save your settings.
We’re done with your basic WordPress setup. Now let’s create your online store.
Step 3: Creating Your Online Store with WooCommerce
There are some things like shipping, payments, currency information that you need to setup before you can start selling.
You’ll be seeing a “Welcome to WooCommerce” notification on your WordPress dashboard. Click on the bold “Run setup wizard” button in the notification to get started.
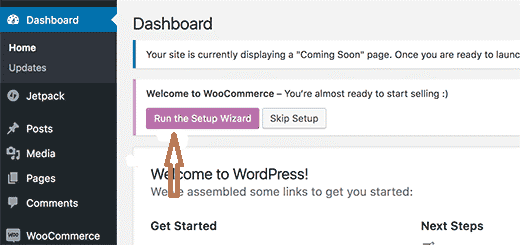
This will take you to the WooCommerce setup wizard, and you’ll need to click on the “Let’s go” button to proceed.

WooCommerce needs a few crucial pages for shop, cart, checkout, and my account. Clicking on the “continue” button will automatically create these pages for you.
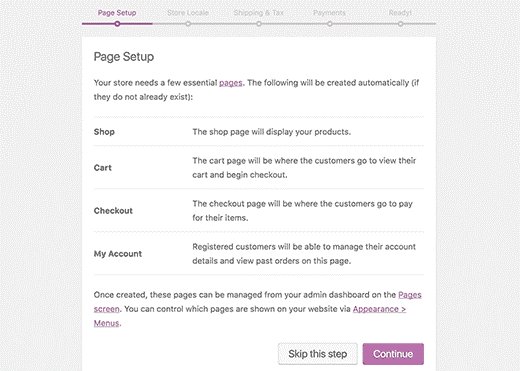
This will take you to the next step.
Here, you will be required to tell WooCommerce the location of your store, unit measures, and currency.
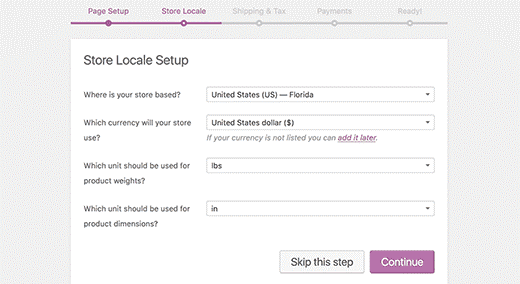
After choosing your currency and location, click on the “Continue” button to go to the next step.
Here’s where you’ll enter your tax and shipping information.
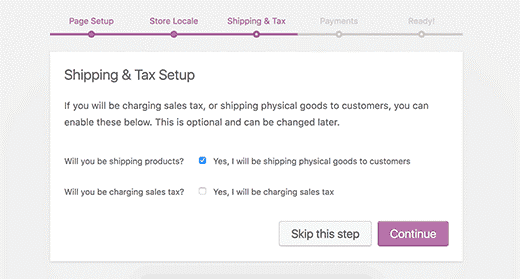
You can typically use WooCommerce to sell both digital products and physical goods that require shipping.
You will need to check the box if you plan on shipping goods or leave it unchecked if your target is digital goods.
After that, you need to answer the small tax question. Good enough, WooCommerce can help you to calculate and add taxes to your prices automatically.
However, if you are unsure of this, just leave it unchecked; you can always add tax information from WooCommerce settings later on.
Done? Click on the “Continue” button to proceed.
The next step is to choose your preferred payment method for your store.
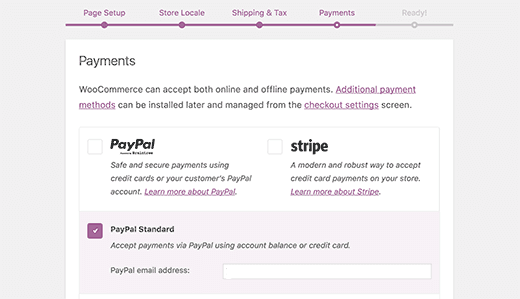
WooCommerce supports Stripe, PayPal, and PayPal Standard payment gateways by default. However, WooCommerce also has several other payment methods that you can install later if you need it.
But the easiest way to accept payment is via PayPal Standard.
Just enter your PayPal email and click on the “Continue” button to move on.
Many people use both Stripe and PayPal. With Stripe, your users will be able to enter their credit card details on the checkout page without having to leave your website and going to PayPal.
You can easily setup Stripe by following the instructions provided by WooCommerce.
Once it’s completed, your WooCommerce online store is fully setup.
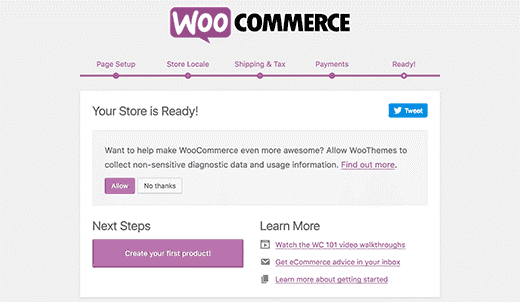
Now, click on the “Return to WordPress dashboard” link to close the setup wizard.
Once the WooCommerce setup is completed, the next step will be to add products to the store.
Step 4: Add Products to Your Store
Let’s quickly add the first product to your store.
Simply visit Products >> Add New page to add a new product.
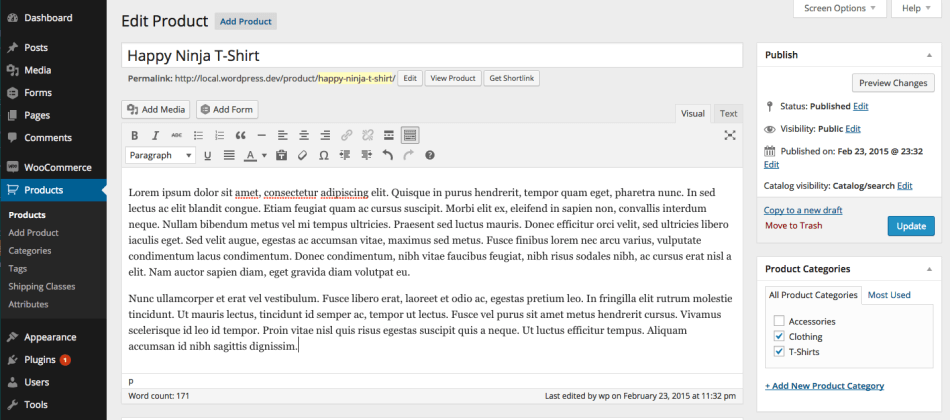
First, provide a suitable title for your product with a detailed description.
Then you will see the “Product Categories” box on the right-hand column. Click on the “+Add New Product Category” tab to create a category for the product. This will help you and your customers to easily sort and browse products.
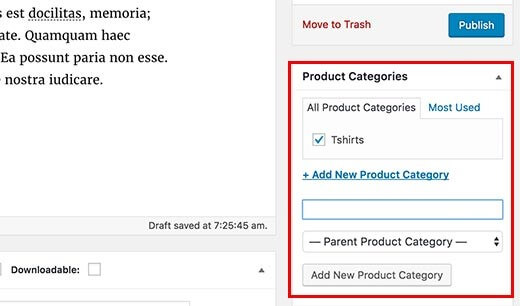
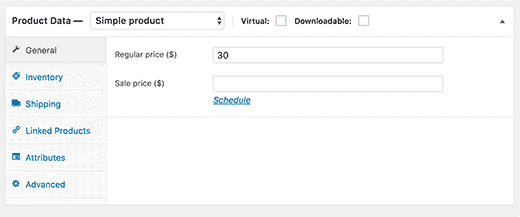
After that, scroll down, and you will see the Product Data box, which is where you’ll provide product-related information such as pricing, shipping, inventory, etc.
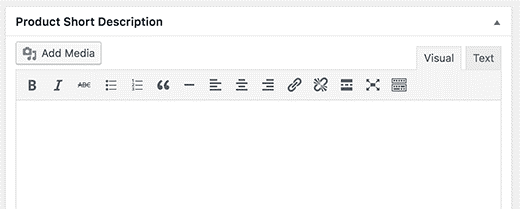
Under the product data box section, you will also see a box to add the product’s short description. This description will be handy when users are viewing multiple products on a single page.
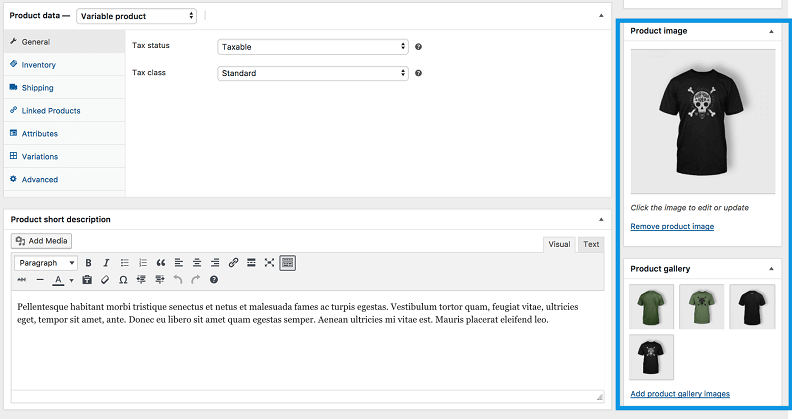
Finally, on your right-hand corner, you will see boxes to add the main product image as well as a product gallery.
When you are fully satisfied with the product information you’ve added, click on the “Publish” button to publish it on your store.
Repeat the same process to add as many products as you want.
Step 5: Choose and Customize WordPress Theme
Themes are what control how your websites look to users when they visit. For a WooCommerce shop, they equally control how your products are shown.
Excitingly, there are thousands of free and paid WordPress themes available.
Bluehost will automatically install the popular Storefront theme for your website upon registration. You will, however, be required to customize it to suit your needs.
To achieve this, find your way to Appearance >> Customize page. This will bring up the theme customizer page where you can change the theme settings.
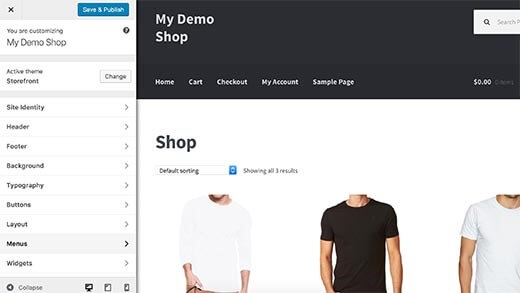
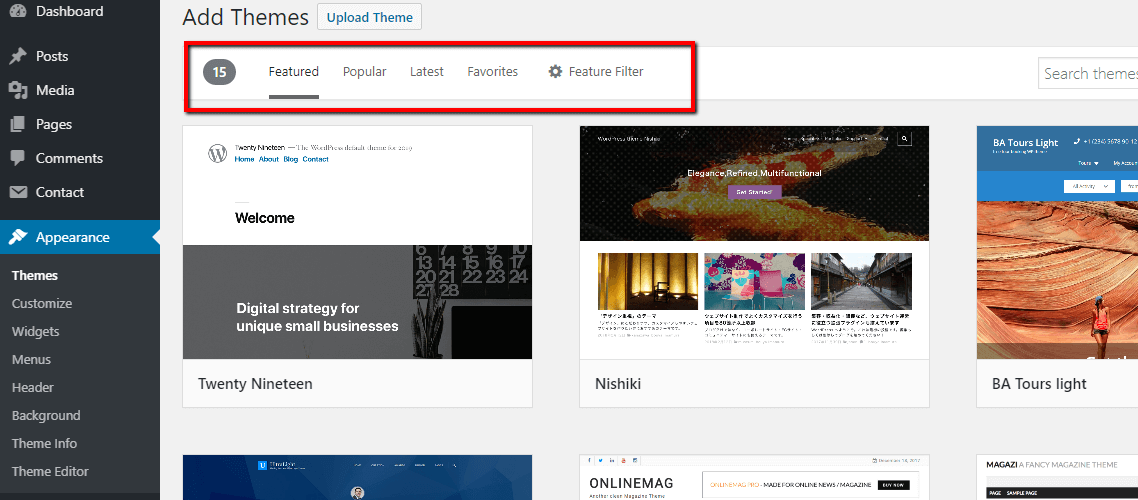
And if you don’t wish to use the Storefront theme, you can choose another theme by going to Appearance >> Themes page:
Now, your online store is fully set up, ready to start receiving orders, and money will start rolling in. Excited yet? I bet you are.
What about order fulfillment?
Once you have added products to your online store and determined how people will pay for them, it’s also essential to figure out how those products will be delivered to your customers.
For example, if you are selling an art file, e-books, whitepapers, or any other type of digital product, you can just give customers a download link on your website or send it through email immediately they make a purchase.
On the other hand, if you’re selling physical products, you will need to choose a shipping company and determine the countries you will ship to, what type of packaging you’re going to use, and how much you’ll be charging for shipping.
Conclusion
Now that you have your store all set up, you should test everything before launching.
Remember, you will never get another opportunity to make an excellent first impression on your users, so you want to thoroughly test every component of the shopping and checkout experience before the first customer visits your store.
For example, you can start by previewing your store on different browsers, placing a test order, and then check your email for the order confirmation email.
Don’t forget to also go through the entire refund process to ensure everything is working correctly.


